There are a few different kinds of floor sanders you should consider renting when restoring hardwood floors. One sander is not going to do the job. First, you will need a drum sander to handle sanding the bulk of the hardwood floor, the middle. You want an even and smooth finish so even and smooth runs up and down the floor should be your focus. Make sure to have plenty of extension cord and be sure that it is a three pronged extension chord, one with a safety prong. If an extension chord gets run over by a drum sander, which does happen, it’s good to have this safety feature to avoid serious electric shock. That is the first thing I mention because safety is first when restoring old hardwood floors as it is with all construction projects.
The second piece of floor sanding equipment that you will need to restore your old hardwood floors is a hand guided sander used to sand the outer edges of a hardwood floor. It is aptly named the edger.
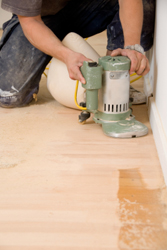
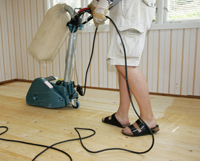
The third sander you will need to rent if you are restoring hardwood floors is called an orbital sander. This sander moves in a circular motion around the operator. The operator is the axis point and the machine can be steered with slight movements of the handle. This floor sander is used to smooth out the flaws left by the drum sander and the edger in the previous step. It is used after the first coat of finish before the next coat is applied.
Kneepads are a key ingredient when you restore hardwood floors. Don’t forget them!
Noise cancelling earmuffs are a necessity. These machines are loud and will definitely damage your hearing.
Dust masks are highly recommended when you restore hardwood floors to protect your lungs. Don’t get the cheapest one at the store. The cheaper ones are thin and don’t offer much protection from fine dust.
Sandpaper. So many types! So many different grits! What do I do? Well, it depends on what type of floor you have. A soft wood floor such as a cherry wood floor will require a lower grit paper than a harder material like oak. Also, the finish on the floor and the age of the floor will help determine what grit you will need when restoring hardwood floors. Talk to a flooring expert in your local home improvement center and ask him what you will need. You will need a heavier grit paper for the first sanding. You should get a different, lighter grit paper for the second and third sanding.
Now that we’ve explained all of the basic equipment needed for restoring old hardwood floors we shall now go through the process.
Sand all of the floors with the drum sander and the edger. Use the scraper to scrape the corners and any awkward areas you could not navigate with the drum sander or edger. The focus should be getting an even floor. Don’t be afraid to put your hand flat on the floor and feel for evenness with your hand. It is a great way to check your work when restoring hardwood floors. Use this technique especially around the edges of the floor. This is the most common area for unevenness. Just because the last guy did a poor job doesn’t mean you do. This is your time to correct any mistakes from the last person who sanded a floor.
Once the area is clean you will want to go over the entire area with the rotary sander. This will take out imperfections left by the rotary drum sander and edger. Use light grit sandpaper for this step. Most of your actual sanding should be done by now. This step is used to get a nice, even surface before the next step.
Now that the floor has been sanded once there should be no wood left not sanded or scraped. Vacuum and clean the area with a quality vacuum. You may also sweep and clean up all dust if you do not have a good vacuum. You need to get every bit of dust up or it will cause grit in the finish. Use wet tack cloths to gather extra dust. Then apply your stain, paint, or urethane. Simple, clear polyurethane will always come out looking nice and will bring out the natural beauty of the wood of your floor.
Next, take your finish and put some into the trays you have. Put your finish applicators in to soak for a minute. Now go to your point furthest from the door and begin applying finish. Apply a nice, even coat and remember that it is better to have a thin even coat than a thick coat. Be sure to apply using strokes that go with the grain of the floor! The finish may bubble during application but do not worry. These will dissipate over hours. Work you way to the door to finish. Do not walk on the floor for twenty four hours. It may appear dry but the finish is soft and the floor is still vulnerable at this time.
Return to the job with the orbital sander and a lighter grit sanding paper. Give a quick buffing sand to the entire floor using this sander. You do not want to spend much time on this step or leave the sander in any one spot too long. The object is to sand away and dust that was sealed into the floor on the last step. Avoid removing too much finish!
Repeat the cleaning process including using tack cloths to gather dust and apply another coat of finish. Wait twenty four hours, buff lightly, and apply one more coat of finish. Now, you should have a beautifully restored hardwood floor that will be a highlight in your home. Wait forty eight hours after all is done to put heavy furniture back on the floor. There is no sense in doing all of that work only to have your furniture damage your newly finished floor because the finish has not had sufficient time to set up.
Now you have a good idea of the proper way to go about restoring hardwood floors in your home. If you want to take the project on yourself then be safe and always plan your next step ahead of time. An alternative is to hire a flooring contractor. Our professional hardwood floor restoring experts will contact you and provide a free quotation for your flooring project.
"I saved myself hours by using FlooringExpertsUSA.com for my new hardword floor installation. I would have had to research and call multiple hardward floor contractors. Instead, I filled out a quick form and local flooring contractors contacted me with price quotes. "I've never had a home improvement project go so smoothly. "
Thank you! The contractor I choose was a true professional. "
"I used a contractor from your service to sand and refinish my hardware floors and I couldn't happier with the decision I made. The results are tremendous and the floor shines like it is new. This is the best thing I have done for the interior of my home. "
© www.FlooringExpertsUSA.com All Rights Reserved.